Pages

Sunday, June 30, 2013

Summertime and the Scrappin' is Easy!

All of my crafty friends... check out iClassygirl's  Summertime and the Scrappin' is EASY! Workshop. I've already registered and can't wait to see what Tiare has in store for us! I hope you'll consider hanging out with me and the rest of the class for a summer of crafting and creativity!
Here's a GREAT $10 off coupon code for you to use. The code is 4U10 and must be entered at checkout to receive the discount. Offer expires 7/7/2013.

Enjoy and I'll see you in class!

See What It Can Do!

This weekend I was quite productive in the crafty sense. And I'm just tickled pink (and green!) about it.

Last fall I purchased a Silhouette Cameo but hadn't had lots of time to play with it. Well this past weekend it was all about the Cameo and coloring digital images.

First, I colored my images (a larger size than needed) using Copic markers. Next, I scanned them into my computer, saving them as JPEG files. Then I brought them into my Silhouette software, traced then resized the images. Finally, I printed the images (using registration marks) and then cut. *I could have actually cut out the space between the little girl's neck and the stem of the flower, but time was an issue and I didn't feel like fooling around with it. Next time though, I'll be a little bit more meticulous!* A BIG thank-you to Miss Alice B for offering the suggestion to do it this way because now I not only have the images stored in my computer for future use, but I can resize them for use on any project. I am very slow (and not very patient) when it comes to coloring so this might actually motivate me to color more and help me to build up a collection of colored images for use on projects.

Both images are from Robert Jackson
 I used the first image to make a card for my soror's 40th birthday which we celebrated last night.


And the second image is for my cousin's birthday card.


So today's lesson is especially for those who have expensive die-cutting machines, other crafty tools, and heck...even computers! We've shelled out megabucks on all of these toys and many times we only use 5% to 10% of their capabilities. So today, commit to learning a new feature on one of your crafty toys. You can use the manufacturer's user's guide or website, YouTube, discussion groups and forums, google it or just sit down and start playing around with your machine. You just might be surprised at what that toy can do and how it can enhance all of your craft projects!

Friday, June 28, 2013

A Tour of Wrinkle-Free Diva's Workshop - Part II

...and here is Part II of the tour of Wrinkle-Free Diva's Workshop.


When thinking about your craft space and how to organize it, take a good, hard look at your workflow and the space you have available to you. Check out videos, blogs and other crafters' organizational tips to find ideas that will work for you. When considering how to store something, think about whether or not that item is something that you will probably acquire a lot of (i.e. rubber stamps or punches) and determine if you will need room to grow for that particular item. 'Cause I have to tell you, it really bites to come up with a way to organize something only to have to re-do it because you've run out of space. And.... it's really helpful and more efficient if you can keep like items together. If memory serves me correctly, this is the 5th or 6th different way I've organized my rubber stamps. I've lived with this system for a year and love it because of how easy it is for me to find them, use  them, and then put them back where they belong. And more importantly, as I continue to acquire stamps, whether they be wood mount, clear or cling, I have lots of space for them and can move them into their storage space as soon as I bring them home.

It took me a long time to get this room organized in a way that feels comfortable and puts almost everything I work with most often at my fingertips. With limited crafting time, especially when school is in session, it is important that I be able to put my hands on anything I am looking for quickly and without having to move a bunch of stuff out the way. I am one of those people who is very visual and needs things out in the open as much as possible in order to remember that I have them. If I can see my stuff, I will remember that I have that stuff. If I remember that I have that stuff, I will USE that stuff. See how this works?

As time goes on, I will continue to share more of my organizational tips. If you have thoughts about things you'd like to see me post about, please share your comments.

As always... thanks for looking!

WrinkleFreeDiva


Thursday, June 27, 2013

A Tour of Wrinkle-Free Diva's Workshop - Part I

Well... here it is... Part I of the tour of Wrinkle-Free Diva's workshop. Without further ado, here it is. Enjoy!


There is a lesson for today by the way, and that is...when videotaping, it doesn't work when you turn the camcorder the same way it does for a regular camera. Your image will be sideways!

Thanks for looking!

WrinkleFreeDiva

Wednesday, June 26, 2013

JUST DO IT! (or My Video is Done!)

Pudder says "Hah hah...gotcha!"

I bet you thought you were going to check in today and see my video(s). Not! I just wanted to let my faithful followers know that I had taken the first step thanks to Angela B. over at Scraps of Color. I was chatting with her this morning and told her that I was dragging my heels about making this video. Why? Not because I didn't want to make the video, but because it was just something new and different (I've never EVER used a camcorder before) and I was afraid. She said... JUST DO IT! So I wanted to let you know that it's done but I need to do some editing and figure out how to upload it. Hopefully, it won't take me too long and you'll get to see the fruits of my labor within the next few days.

Until then...STAY TUNED!

WrinkleFreeDiva

Monday, June 24, 2013

Lots of Tips Today (and a Layout Too!)

I have lots to share today so I hope this post doesn't get too long. If you're like me with adult-onset ADD (self-diagnosed of course!) then you don't have the attention span to read a long drawn out post. So let's get right to it!

I was working on a layout with lots of pictures, and as I most often do, began with a sketch. I decided that I was going to use some pretty green glitter cardstock as my background paper which means I would have needed two full 12 x 12 sheets. I don't know about you, but when it comes to pretty AND expensive cardstock, I hate to use full sheets only to have most of it covered up. Since this layout called for lots and lots of pictures and strips of paper, I came up with a solution that would allow me to minimize the amount of green cardstock used.

I have a package of Recollections white cardstock purchased for another project and which I really don't like to use for scrapbooking because it is so flimsy. So I used two of those to place my strips of cardstock, patterned paper, and pictures on since they would be totally covered up.


In the finished layout, none of the white cardstock was left showing. I've also been known to cut a square (to save for later use) out of the middle of background cardstock, especially when another piece is being layered on top. I also save the white cardstock that comes in scrapbook album pages for these types of uses.

The sketch called for two 4 x 6 portrait-oriented photos. Digital photos are usually printed at 4 x 5.33. So I double-matted my photos to make them fit the space.


I also added a little white acrylic paint to the edges of the 2 x 2 photos so that they would stand out on the page without having to be matted first.


Once everything was laid out, I struggled with what letters to use for part of my title. I didn't have the color or size that I needed, and didn't want to cut them with my diecut machines, because at that small of a size they wouldn't have cut well. Computer to the rescue!


Using WordArt in MS Word I created the portion of the title needed in several colors so that I could try them out on my layout. After making my selection, I hand cut a banner and inked the edges (inking hides a multitude of cutting mishaps).

Finally everything came together (or so I thought!) and I adhered everything to the layout. But something still seemed to be missing! I hadn't inked the journaling box and it looked so stark on the page. Looking at the theme and story of the page, I thought hmmmm, how about stitching?! Rub-ons to the rescue! I added some to the journaling box and, not wanting to throw the leftovers out, added some to the bottom of the banner as well. And here is the completed layout!

Die-cut clothing is from the Silhouette Online Store. Alphas (Thickers)
Now... if you're still with me, here are the take-a-ways for today:
  1. Consider using inexpensive cardstock for the base of your layout when it's going to be all covered up anyway.
  2. If only a small amount of your background cardstock is going to be showing (i.e. a one- to two-inch border) and it's going to be covered by another piece of cardstock, cut out the center of the background piece. That will leave you up to a 10 x 10 piece for another project.
  3. When using a sketch, don't be afraid to change it up. Don't force your elements into the sketch; make the sketch fit your elements.
  4. Create a mat around your photos by using acrylic paint.
  5. Use your computer to create titles.
  6. Inking edges hides cutting mistakes or imperfectly sized borders!
  7. Stitching creates instant borders. Hate to sew? Try rub-ons, templates or do it yourself!
Thanks so much for hanging with me today!

WrinkleFreeDiva

**P. S. I'm getting the video camera warmed up! Stay tuned for a video of WrinkleFreeDiva's workshop

Sunday, June 23, 2013

Challenging Myself

On Friday, June 14th I hosted FNC over at Scraps of Color. I love Friday Night Challenges because they really help me to hone my crafting skills. I especially enjoy hosting because it forces me to try different techniques in order to prepare fun challenges for the participants.

The challenges and my projects were as follows:

Challenge #1Create a card (shape and size your choice) using a sponge and two or more colors of ink to make a background on white cardstock. Then stamp an image on it using a RUBBER stamp. Add some bling, ribbon, a corner punch and a sentiment. You may mat your sponged cardstock if you desire; however, NO PATTERNED PAPER ALLOWED!


Challenge #2Create a card (shape and size your choice) using white cardstock, two or more background stamps and no more than two colors of ink. If you don’t have any background stamps, you can sponge through a template onto the cardstock as well.Then stamp one or more images (they can be the same or different) on it using a RUBBER stamp and BLACK ink. Add ONLY a sentiment and mat to the white cardstock. No bling, ribbon, brads/buttons or other embellishments. Again, NO PATTERNED PAPER ALLOWED! (I got this idea from Stampers Sampler Take Ten magazine and managed to make two cards for this one!)


Challenge #3Use the following sketch to create a Father’s Day card. That’s it…added touches are up to you!


And finally, there was a challenge that participants had a week to complete. They were to use one of Classygirl's sketches to make a layout. I struggled a lot with making my pictures fit the sketch, but that's the beauty of sketches, you can rotate or flip them to suit your needs. And sometimes, the sketch really is just a jumping off point that gets your creativity cranked and cookin'!


If you've read this far, sorry... I have no profound lesson today. Just me and my sketches in this post!

Thanks for lookin'!
WrinkleFreeDiva

Wednesday, June 19, 2013

Taming Your Titles, Part 2

Last week I participated in Classygirl's June Scrapbook Pajama Party. It was truly a lot of fun watching Tiare talk us through her creative process while the rest of us worked diligently to keep up and get our layouts and cards done. We began with a sketch (good for me 'cause you know I am ALL about using sketches) and threw in some paint splatters for good measure. However, you know me... the slowpoke... the overthinker... I struggled to keep up and didn't get my card done, but I am proud to report that I finished my layout... the next day!

When choosing letters for my titles, I always want to make sure that they will fit in the space and fit the mood of the page. That's easy when you're using die-cut letters. You can move them around until you get them just how you want them. But with self-adhesive letters like Thickers, once you remove them from the backing, you need to stick them to something whether it be your layout or something else. This is where the packaging comes in handy.

After peeling off my letters, I stuck them on the cellophane packaging and moved them around on top of my layout until I was satisfied with the placement.


Once I was happy with the layout, I simply removed them from the packaging and stuck them on my layout! While I was at it, I managed to pull some old stuff out of my stash and use those items on my layout as well. I really like the way the distressing and paint splatters look on the background paper...in person it looks almost like batik cloth. Thanks Tiare for helping me get outside of my comfort zone.


So remember, when you're layout out self-adhesive letters for your title, use the packaging they come in to help you figure out the placement. If you don't have the cellophane packaging, wax paper also works nicely (I actually keep a roll in my craft room). Easy way to make sure they'll fit before adhering them permanently to your project!

Thanks for taking the time to stop by!

WrinkleFreeDiva


Tuesday, June 4, 2013

Those Shifty Fibers

I recently took an online stamping class over at My Creative Classroom, and just as with all of the other online crafty classes I take, I fell behind. I did manage to get a few of the assignments completed. This one involved using the Versamark Watermark Stamp Pad on darker paper and then layering the same stamp on top. I stamped the forward most tree with Forest Moss distress ink and heat embossed the image. I've never used Versamark before and was quite pleased with the way the card turned out.

The little tip I want to share with you today involves getting your fibers to stay in place. For this card I used some really old paper raffia from my stash. Generally when I add twine, floss, other fibers, and sometimes ribbon to cards or layouts, I use plain ol' ordinary scotch tape to hold it in place in the back. That keeps it from shifting around when I flip the card over to tie it in the front. No need to use costly adhesives because it's not going to show on the finished project.


Taping it in back makes it easier to tie it exactly where I want to in the front.


And here is the finished card! This one was from the staff at my school and went to our principal who resigned at the end of this school year.


So today's tip? Tape those fibers in place in the back to keep them from shifting around.

Thanks for looking!

WrinkleFreeDiva

Monday, June 3, 2013

Adhering Vellum (or Spray Adhesive to the Rescue)

The other day I went to Michaels with my honey. He picked up a can of this repositionable tacky spray adhesive and with his silly self sprayed it all over his hand, ostensibly to see how tacky it was. Apparently, it worked the way he wanted it to (he wanted to use it on his softball bat grip and I think his golf clubs too) so off to the cashier we went, he with his glue spray and me with my pretty paper box. As we were walking to the car, I thought hmmmmm.... I've got lots of different adhesives, but I don't have any spray adhesive. Wonder if I should have some in my stash? *You know how we crafters can figure out a need for anything!* Well...I got an opportunity to try it today.

I made this card for my nephew who will be graduating from high school this Friday. After putting the whole card together, I decided to do the inside sentiment on vellum. Next problem, how to put the vellum on the cardstock. I didn't want to use brads, eyelets or staples, and although I have some adhesive squares made just for vellum, I'm not thrilled with how they look when they're applied. Then I remembered honey's spray adhesive. Now mind you, I have lots of other adhesives made by this manufacturer and really like them (great for gluing on bows!) but I didn't know they had a spray. Am I the only one?

Can I just say, that I LOVE this spray? Application was clean and quick and my vellum adhered to the cardstock with no bubbles, marks or anything else! Looks like I will finally have a way to adhere and use up all of the vellum sentiments in my stash! My dear sweet man said I could use his can of spray but nahhhhh....I want my own! Next up, I'll try it on a transparency. So, here's the card...

The sentiment was typed on both the cardstock and the vellum.

Graduate die-cut, Silhouette file; 2013, American Crafts Thickers; and a little Glossy Accents to make his shoes shine.


So for today's lesson: If you have an element that could be marred by using regular adhesives, either because it is too sheer or too flimsy, try a spray adhesive.

Thanks for looking!
WrinkleFreeDiva

Saturday, June 1, 2013

Printing Card Sentiments

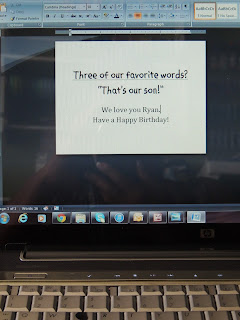
For the longest time, whenever I needed to type an inside sentiment for a card, I'd type it into my computer, insert my 8 1/2 x 11 cardstock into the printer, and then trim it down to the size needed for the inside of my card. Inevitably, after cutting it down to size, my printing would be off center or the text would be too large or too small for the space. Sometimes, I'd print it again and other times I'd just say to heck with it and leave it the way it was.

There had to be a better way. Then it dawned on me! I could cut my paper first and then print on it, instead of the other way around. For this card, I needed the white inside piece to be 5" x 3.75". I went into MS Word's page layout and changed my paper size to custom, entered the paper dimensions, changed my margins to 0.5, and typed my perfectly-sized text into my document.


I cut my cardstock to the same size, inserted my paper into the printer, adjusted my paper guides accordingly and printed! Voila! A perfectly sized and typed sentiment!


I used it inside of this slider card (the cut file came from the Silhouette Online store)...

Bazzill cardstock in white; DCWV Dots, Stripes and Plaids; RYAN sticker and metal dots (really old from my stash);
American Craft Alpha rub-ons, 

So today's lesson is this, let your printer do the sizing work for you when making the sentiment panels for the insides of your cards.

  1. Decide on the size panel you want.
  2. Go into your word processing software and change the paper size. Adjust your margins if you'd like.
  3. Cut your cardstock the same size.
  4. Print! 

And that's it!

I want to close by saying that today is my only offspring's 12th birthday. Happy Birthday "Skootch!" aka "Delawoo!"


Thanks for stopping by!

WrinkleFreeDiva!